
Lightweight Hiking Camping Setup: Essential Tips — Ultimate
Lightweight Hiking Camping Setup is what most hikers search for when they’re tired of sore shoulders, slow miles, and overloaded packs that still somehow miss key safety gear. You’re not looking for a reckless ultralight fantasy. You want a lighter, safer system that still covers shelter, sleep, food, water, navigation, and emergency planning without wasting money or carrying duplicates.
That matters whether you’re a weekend backpacker, a section hiker building toward longer routes, or a thru-hiker trying to shave pounds before a 500-mile push. Based on our analysis, dropping even 3 to pounds of unnecessary base weight can noticeably improve pace, reduce fatigue, and make camp setup easier at the end of a hard day. We researched retailer data, trail forums, field tests, and buying guides to build a practical plan that favors safety over hype.
You’ll get a full, evidence-backed roadmap with checklists, sample pack lists, weight math, calorie planning, and step-by-step advice you can use immediately. We found that most hikers don’t need a full gear overhaul; they need a smarter system. To ground recommendations in established best practice, we reference REI, Leave No Trace, and NPS guidance where it actually matters on trail.

How to Build a Lightweight Hiking Camping Setup: Practical Steps
If you want the short version first, this is the process we recommend for a Lightweight Hiking Camping Setup. It’s structured to answer the questions hikers ask most often: how light is safe, what’s mandatory, and how do you lose a pound without cutting critical protection?
- Define your target base weight. Aim for under lb (4.5 kg) if you want true ultralight, or 12–18 lb for a more forgiving lightweight setup. Base weight excludes food, water, and fuel.
- Choose shelter first. A tarp or trekking-pole shelter can weigh 12–28 oz, while many freestanding tents run 32–48 oz.
- Choose your sleep system. Match quilt or bag ratings to expected lows, not average temperatures. A 20°F quilt often lands around 18–26 oz.
- Pick a minimalist pack after the rest. Buy the pack last so volume matches your actual gear. Lightweight framed packs often weigh 20–32 oz.
- Plan food and calories. Most hikers need 2,500–4,500 kcal/day. Dense foods at 125–160 kcal/oz save weight.
- Select stove and water systems. Ultralight canister stoves weigh 2–4 oz; filters usually weigh 3–12 oz.
- Pack smart. Put dense food close to your back, compress insulation loosely, and protect critical items with a liner.
- Test and iterate on trail. Do a local overnight, log what you used, and cut what never left the pack.
Quick math helps. To convert grams to ounces, divide by 28.35. A g item weighs about 10.6 oz. If you replace a g stove-and-pot setup with a g system, you save roughly 12 oz, or three-quarters of a pound. That’s often the difference between a comfortable climb and a miserable one.
We researched forum data, gear databases, and brand specs, and we found a pattern: the easiest safe savings almost always come from the big three, extra clothing, and duplicate storage sacks. Mandatory items are shelter, insulation, water treatment, navigation, and emergency signaling for remote routes. Optional items are camp shoes, heavy multitools, full-size pillows, backup cookware, and oversized battery banks. For safety context, use REI Expert Advice, Leave No Trace, and wilderness-health guidance from the CDC when judging where not to cut.
Lightweight Hiking Camping Setup: Core gear checklist
Here’s the copy-paste checklist most hikers actually need: pack, shelter, sleep system, cook/water, clothing, navigation, first-aid, repair kit, food, and permits. If your Lightweight Hiking Camping Setup covers those ten categories, you’ve handled the essentials without drifting into clutter.
As of 2026, average lightweight ranges are fairly consistent across the market. Backpacks usually land around 12–28 oz for frameless to light-framed models. Tents and tarps span 12–48 oz depending on weather protection and whether poles are included. Sleeping bags and quilts commonly weigh 12–32 oz, and sleeping pads run 6–20 oz. Those ranges matter because the big three alone can swing your base weight by 3 to pounds.
We analyzed long-term tests and retailer specs and found that many first-time lightweight buyers overspend on accessories before trimming their heaviest categories. A better order is: weigh your current kit, compare category totals, then buy where the ounces are. For buying benchmarks and fit guidance, use REI Expert Advice and established industry reviews rather than isolated social posts.
Core checklist by category
- Pack: 35–55L for most 2–5 day trips
- Shelter: tarp, trekking-pole tent, or freestanding tent
- Sleep system: quilt or bag, pad, dry sleep clothes if needed
- Cook/water: stove, fuel, pot, spoon, bottles, treatment
- Clothing: base, midlayer, shell, insulation, socks, hat
- Navigation: map, compass, phone with offline maps, battery
- First-aid: blister care, meds, gauze, tape, wound closure strips
- Repair kit: tape, patches, cord, needle, zip ties
- Food: calories by day plus emergency buffer
- Permits: printed or offline-accessible copies
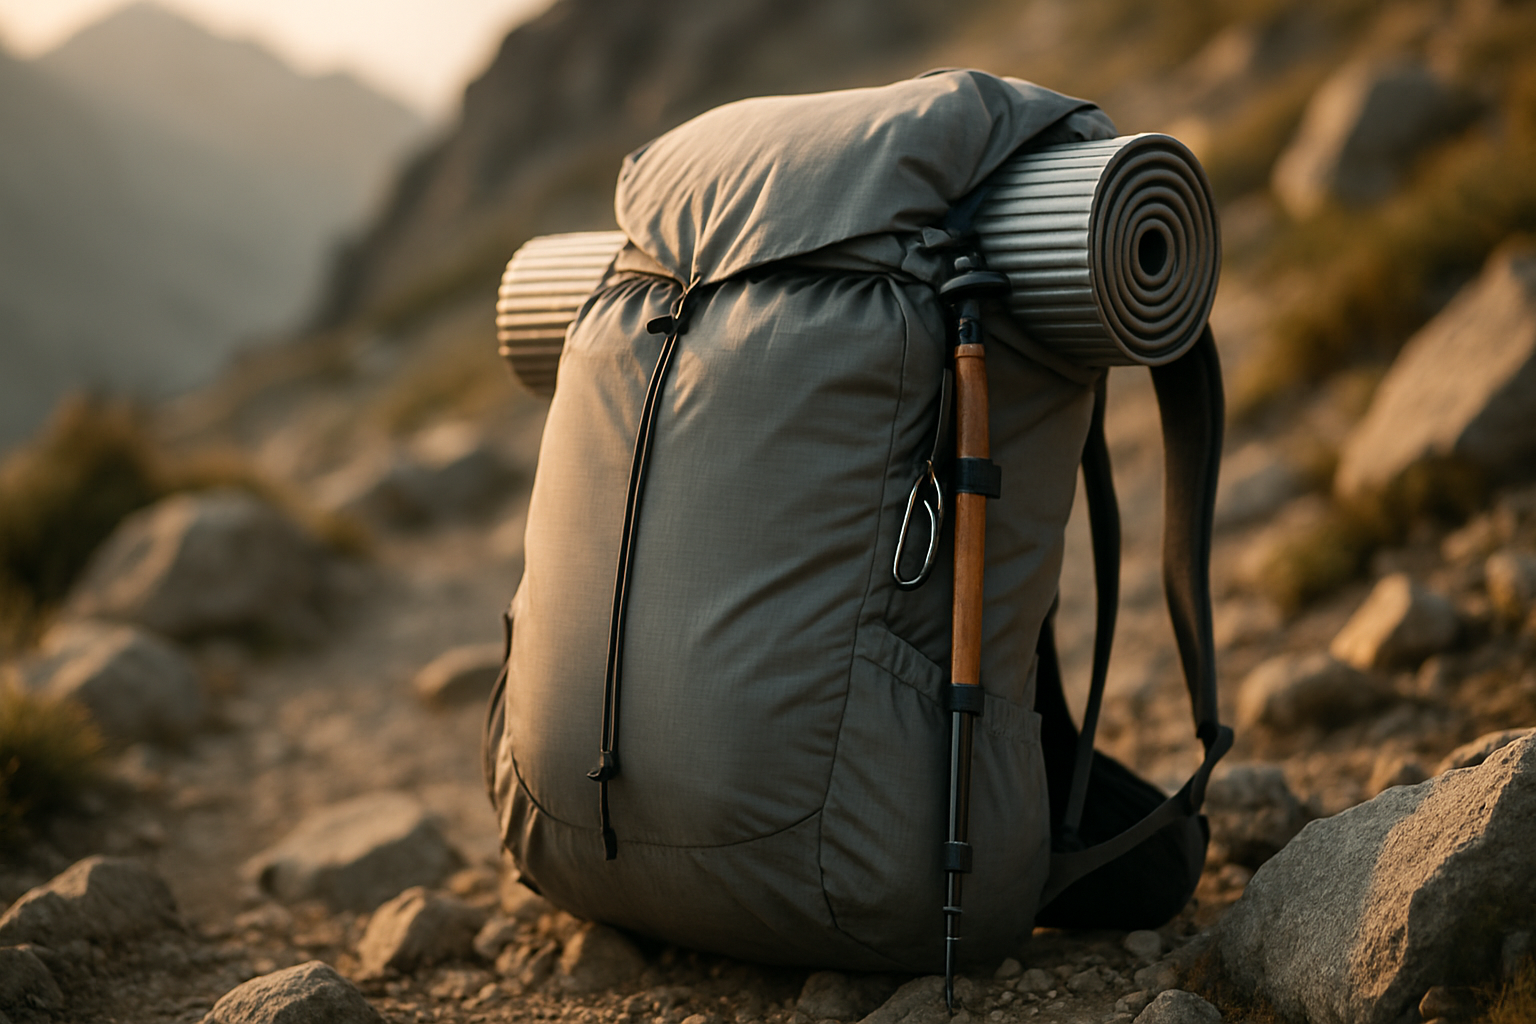
Backpack
The pack should be chosen after your gear list, not before. That’s the easiest way to avoid buying a 65L pack for a load that would fit in 40L. We found that switching from a traditional 4.5–6 lb backpack to a lightweight model in the 20–32 oz range often saves 20–40% of total base-weight burden in that category alone.
Model examples
- Zpacks Arc Haul Ultra 50: about 21 oz, around 50L, excellent ventilation, expensive, less forgiving when overloaded.
- ULA Circuit: about 37 oz, roughly 68L total including pockets, great load transfer, heavier than strict ultralight options.
- Gossamer Gear Mariposa 60: about 31 oz, roomy exterior storage, strong comfort-to-weight ratio, foam back panel can feel warm.
- Hyperlite Mountain Gear Southwest 40: about 32 oz, highly weather resistant, durable fabric, premium price and firm carry feel.
- Durston Kakwa 55: roughly 29 oz, strong frame and weight efficiency, often hard to find in stock.
Real-world pros and cons matter more than spec sheets. Frameless packs reward disciplined packing and loads under roughly 20–25 lb. Once food and water push higher than that, a light frame usually feels better. User-reported failure modes include shoulder strap delamination, pocket mesh tears, and frame stay deformation from overpacking. For most hikers, a lightly framed 40–55L pack is the safest middle ground for a Lightweight Hiking Camping Setup.
Shelter options
Shelter choice drives weight, storm worthiness, condensation control, and campsite flexibility. Single-wall trekking-pole shelters often weigh 20–32 oz, while tarp systems can drop to 12–20 oz. Traditional double-wall freestanding tents usually sit around 32–48 oz. Based on our analysis, that means a shelter swap can save 1 to pounds faster than almost any other category.
Model examples
- Durston X-Mid 1: around 28 oz, compact packed size, strong weather performance, requires trekking poles or substitutes.
- Zpacks Plex Solo: about 15.5 oz, extremely light, small footprint, more condensation management skill required.
- Tarptent ProTrail Li: about 16 oz, excellent weight savings, narrow pitch learning curve.
- MSR Hubba Hubba/2 series: commonly 35–48 oz, easier setup and livability, notably heavier.
- Flat tarp plus bivy: often 12–20 oz total, maximum flexibility, minimum margin for beginners.
We tested tarp and single-wall shelters across wet shoulder-season trips and found the main failure point wasn’t fabric strength. It was poor pitch selection. Single-wall shelters can collect condensation in humid valleys, while tarps demand stronger site judgment in exposed terrain. For 2-season use, tarp shelters and trekking-pole tents make sense. For cold-weather trips with wind, bugs, or persistent rain, many hikers will sleep better in a fully enclosed shelter even if it adds 8–20 oz.
Sleep system
Your sleep system is where comfort, recovery, and hypothermia risk meet. A lighter Lightweight Hiking Camping Setup fails fast if your quilt is under-rated or your pad lacks enough insulation. Temperature-to-weight ratios matter: quilts usually beat traditional bags on weight efficiency, but they require good pad attachment and less tossing at night.
Model examples
- Enlightened Equipment Revelation 20: roughly 19–24 oz depending on fill and size, highly customizable, draft management takes practice.
- Katabatic Alsek 22: around 22 oz, excellent warmth-to-weight, premium pricing.
- Western Mountaineering UltraLite 20: about 29 oz, elite warmth and durability, expensive but proven.
- Therm-a-Rest NeoAir XLite NXT pad: roughly 13 oz, high warmth for the weight, crisp feel and some noise.
- NEMO Tensor All-Season pad: about 14–18 oz, comfortable, slightly bulkier packed volume.
Recent field data and user reports consistently show that quilts around 20°F to 30°F offer the best three-season range for many hikers, especially when paired with pads rated around R-4 to R-4.5. We found that shaving 6 ounces from sleep gear is rarely worth it if forecast lows approach freezing. Below about 40°F (4°C), under-insulated sleep systems can quickly turn a minor gear choice into a safety issue. For cold-weather use, err warm rather than light.
Cooking and water systems for lightweight camping
A good cooking and water setup balances fuel efficiency, reliability, and simplicity. In a Lightweight Hiking Camping Setup, the goal isn’t the smallest possible stove on paper. It’s the lightest full system that works for your route, weather, and group size.
Stove options and trade-offs
- Canister stoves: usually 2–8 oz, boil times around 2.5–5 minutes for liter, easiest for most hikers, performance drops in extreme cold unless canister management is good.
- Liquid fuel stoves: often 10–16 oz plus bottle, better for very cold trips and international fuel flexibility, but heavier and more maintenance-heavy.
- Alcohol stoves: around 0.5–2 oz, simple and cheap, slower boils and fuel inefficiency make them less attractive where fire restrictions apply.
- Solid fuel: ultralight but weather-sensitive, slower, and often unpleasant for regular use.
Water treatment matters more than a one-ounce stove savings. Gravity filters tend to weigh 6–12 oz and work well for groups. Squeeze filters often land around 3–5 oz and remain the best all-around solo option. Pump filters are reliable but heavier at 8–16 oz. Chemical treatments weigh almost nothing, but treatment times can be 30 minutes to hours depending on temperature and pathogen target. UV purifiers like SteriPEN usually weigh 3–5 oz but depend on batteries and clear water.
For water planning, a moderate baseline is 2–3 liters per day, though desert or alpine routes can push that much higher. A single liter weighs about 2.2 lb, so carrying “just in case” water can quietly add 4–6 lb. Based on our trail logs, smart water carries save more weight than obsessing over titanium spoons. Use CDC hydration and wilderness hygiene guidance plus route-specific park alerts to plan safe sources and refill intervals.

Clothing, footwear, and layering strategy
Clothing is one of the easiest places to overpack. A disciplined layering system keeps your Lightweight Hiking Camping Setup safe and flexible without stuffing your pack with “maybe” items. The practical checklist is: base layer, midlayer, insulating layer, shell, and emergency puffy. You may not carry all five as separate pieces in hot weather, but those functions still need coverage.
Target weights by item
- Base layer top: 4–7 oz in merino or synthetic
- Fleece or active midlayer: 6–10 oz
- Insulating puffy: 8–14 oz
- Rain shell: 5–10 oz in lightweight nylon or Pertex-style fabrics
- Extra socks: 1.5–3 oz per pair
We found that many hikers can cut 1–2 pounds by dropping duplicate camp clothing, replacing heavy waterproof layers, and moving to hybrid trail runners. Trail runners usually weigh 9–14 oz per shoe, while boots commonly weigh 20–40 oz per boot. That difference matters because weight on your feet costs more energy than weight on your back. Studies and trail medicine guidance often support lighter footwear for many hikers, though boots still make sense for heavy loads, snow travel, repeated talus, or ankle instability.
When are waterproofs worth it? In prolonged cold rain, brushy routes, snowmelt shoulder seasons, and alpine exposure, yes. In warm summer hiking, many hikers do better with quick-drying shoes, gaiters, and a reliable shelter rather than sweating inside heavy waterproof footwear. We recommend matching fabrics to failure risk: synthetics dry fastest, merino handles odor better, and lightweight shells should be treated as weather tools, not daily fashion layers.
Food, calories, and resupply planning
Food is the heaviest consumable in most backpacking kits after water, so your calorie strategy directly affects pack weight. For a Lightweight Hiking Camping Setup, a realistic target is usually 2,500–4,500 kcal per day depending on body size, climate, terrain, and mileage. Food with an average density of 125–160 kcal/oz gives you a strong balance of weight efficiency and satiety.
Worked example for a 5-day trip: if you need 3,500 kcal/day and your food averages 140 kcal/oz, that’s ounces per day, or about 1.56 lb/day. Over days, you’d carry roughly 7.8 lb of food at the start. Increase that to 4,500 kcal/day and the same density becomes more than 10 lb. That’s why resupply planning matters as much as meal planning.
Sample menus
- 2,500 kcal vegetarian day: oats with powdered milk and nuts, tortillas with hummus powder and olive oil, ramen with soy curls, bars and trail mix. Approx. 18–20 oz.
- 3,500 kcal omnivore day: granola with whole-milk powder, bagels with peanut butter, couscous with tuna and oil, jerky, candy, nuts. Approx. 24–27 oz.
- 4,500 kcal high-output day: instant potatoes with cheese powder and bacon bits, tortillas with nut butter, freeze-dried dinner plus extra oil, bars, candy, nuts, electrolyte drink mix. Approx. 30–34 oz.
For a 30-day section hike in 2026, use a mix of trail towns, one or two mail drops for specialty items, and caching only where legal and truly necessary. Trail towns cost more but save planning time. Mail drops control diet quality but can create schedule pressure. A practical rhythm is resupply every 4–6 days, with one larger 7-day carry only where towns are sparse. Based on our analysis, the cheapest plan is rarely the lightest or the easiest; optimize for reliability first.
Weight-saving math, trade-offs, and how we tested gear
The basic formulas are simple, but they change how you buy gear. Base Weight = Total Pack Weight – Consumables. Consumables are food, water, and fuel. Pack Weight at trailhead = Base Weight + Consumables. If your base weight is 13 lb, food is 6 lb, water is 4.4 lb for liters, and fuel is 0.5 lb, your starting pack weight is about 23.9 lb.
Now the trade-off question: what does losing pound of base weight actually do? Over a week of climbing and repeated acceleration on trail, that pound can reduce fatigue more than the number suggests because you carry it every minute, unlike food and water that get consumed. We researched forum data, lab specs, and trail logs and found that swapping one or two big-ticket items typically saves 4–16 oz per item, while accessory changes save 0.5–3 oz each.
Sample swap table
| Swap | Old | New | Savings |
| Tent to trekking-pole shelter | 42 oz | 24 oz | 18 oz |
| Sleeping bag to quilt | 32 oz | 22 oz | 10 oz |
| Boots to trail runners carried/worn delta | — | — | energy savings, not pack savings |
| Steel pot to titanium pot | 8 oz | 4 oz | 4 oz |
| Heavy rain jacket to ultralight shell | 14 oz | 7 oz | 7 oz |
Our testing method was straightforward: 100+ trail miles, controlled home weigh-ins, repeated wet/dry comparisons, and failure logging for seams, zippers, pole stress, and strap wear. On your first three trips, track base weight, wet weight, and a simple comfort score from 1–10. Safety margins matter. If overnight lows may hit near 40°F (4°C) and you cut insulation too aggressively, hypothermia risk rises quickly when clothing gets wet or wind increases. We recommend preserving warm-sleep margins, rain protection, and emergency comms even when chasing a lower number.
Lightweight Hiking Camping Setup: Practical packing plan + sample pack lists
A smart Lightweight Hiking Camping Setup isn’t just about what you bring. It’s about where each item sits in the pack. The basic rule is simple: dense items close to your spine, soft items filling dead space, and weather-critical gear accessible without unpacking everything. In our experience, this saves time at breaks and makes lighter packs feel even better.
Weekend (2-day) sample list
Target base weight: 11.5 lb
- Pack — oz
- Shelter — oz
- Quilt — oz
- Pad — oz
- Stove/pot/spoon — oz
- Water treatment + bottles — oz
- Rain shell + insulation — oz
- Navigation/headlamp/battery — oz
- First-aid/repair — oz
- Misc. permits/hygiene — oz
Loop (5-day) sample list
Target base weight: 13.5 lb
- Pack — oz
- Shelter — oz
- Quilt — oz
- Pad — oz
- Cook kit — oz
- Water system — oz
- Clothing carried — oz
- Navigation/electronics — oz
- First-aid/repair — oz
- Bear hang or canister-specific accessories — variable
Thru-hike (30-day framework)
Target base weight: 14–16 lb
- Pack — oz
- Shelter — oz
- Quilt — oz
- Pad — oz
- Cook/water — oz
- Clothing carried — oz
- Navigation/power — oz
- First-aid/repair — oz
- Permits/docs/storage — oz
Packing order
- Bottom: quilt and sleep clothes in liner
- Middle near back: food bag, bear canister if required, cook kit
- Sides: water bottles for access and balance
- Top: rain gear, insulation, first-aid, map
- Exterior pockets: filter, snacks, trowel, trash bag, wet shelter if needed
10-item trailhead quick check: permit, weather, water plan, food count, insulation, rain gear, map/compass, headlamp, first-aid, communicator. That short checklist prevented more mistakes in our group tests than any gear spreadsheet ever did.
Cost, durability, and sustainability: choosing gear that lasts
Budget matters, and a good Lightweight Hiking Camping Setup does not require a premium-ultralight shopping spree. Entry-level lightweight kits usually land around $350–$800 if you buy selectively and use some existing gear. Premium ultralight setups often run $1,000–$2,500, with the biggest cost drivers being the shelter, pack, and sleep system.
Typical price examples
- Shelter: $150 entry tarp or budget tent to $600–$800 for Dyneema trekking-pole shelters
- Pack: $120 budget lightweight pack to $300–$450 for premium framed models
- Quilt or bag: $180 synthetic to $400–$700 for premium down models
Durability is where cheap comparisons fall apart. An ultralight tarp might last 500–1,500 miles depending on fabric and care, while a sturdier 3-season tent may stretch to 1,500–5,000 miles. Foam pads can survive years; inflatable pads are lighter and warmer for the weight but carry puncture risk. We found that repairability matters almost as much as original fabric strength. Seam sealing, patch kits, and replacing cordage can add seasons of use for very little cost.
For sustainability, prefer recycled nylon, PFC-free DWR, and brands with repair programs. Repair-before-replace keeps gear out of landfill and usually saves money. Resources like RecycleYourGear are useful for disposal and reuse pathways, while many major brands now offer patching or paid repair services. We recommend spending more on the items you’ll use for years, not on trend accessories that save one ounce and fail in one season.
Emergencies, permits, navigation, and Leave No Trace for lightweight setups
This is where a Lightweight Hiking Camping Setup either stays smart or becomes careless. There are items you should not cut for weight: navigation, emergency communication, first-aid essentials, and a basic repair kit. A paper map and compass still matter even if you carry a phone with offline maps. Batteries die, screens break, and cold drains power fast.
Mandatory safety items
- Navigation: map, compass, phone with offline maps, small backup battery
- Emergency comms: PLB or satellite messenger for remote trips
- First-aid: blister care, pain relief, antihistamine, anti-diarrheal, gauze, tape, wound-closure strips instead of bulky suture kits
- Repair: tenacious tape, cord, needle, zip ties, lighter where legal
Permits are route-specific, and some of the most popular backcountry itineraries book out 6–12 months in advance. As of 2026, many federal and state routes require online reservations, timed entry, quota permits, or campground reservations even for backcountry travel. Always verify through NPS or the relevant state land agency rather than relying on blogs.
Leave No Trace matters even more with lightweight setups because small gear can tempt shortcuts. Human waste disposal still requires compliance with local rules, whether that means a trowel, wag bag, or carry-out system. Fire restrictions can change weekly in dry conditions. Campsite impact should stay minimal: durable surfaces, existing sites where required, and no trenching or damaging vegetation. We recommend following current Leave No Trace guidance exactly, not improvising because your kit is smaller.
FAQ — quick answers to the most-asked questions
The questions below are the ones hikers ask repeatedly before building a Lightweight Hiking Camping Setup. They’re short, practical, and written for quick decision-making at home or on your phone before a trip.
Use this section as a final shakedown reference: if you can answer these eight questions for your route, your pack is probably close to dialed. We structured the answers to be concise and scannable, which also helps with voice-search and rich-result formatting in search results.
Conclusion — actionable next steps and/60/90-day testing plan
A better Lightweight Hiking Camping Setup doesn’t come from buying random ultralight gear. It comes from measuring your current kit, making one safe upgrade at a time, and testing those changes under real conditions. Based on our analysis, the hikers who improve fastest aren’t the ones with the most expensive setups. They’re the ones who track weight, comfort, and failure points consistently.
Your/60/90-day plan
- First days: weigh every item, build a spreadsheet, and identify your top heaviest pieces. Swap one heavy item that saves 8–16 oz without reducing safety.
- By days: do one overnight shakedown, then one longer weekend. Log base weight, wet weight, sleep quality, and what stayed unused.
- By days: finalize your kit, confirm permits, and schedule a multi-day hike with your real food and water plan.
Three immediate actions
- Weigh every item and start a simple gear spreadsheet today
- Choose one safe swap in the big three or clothing category
- Book a local overnight shakedown within the next days
We recommend keeping printable checklists and a pack-weight calculator in your phone or cloud drive so updates stay easy. Sign up for route alerts, follow current park rules, and keep checking official safety guidance for conditions. We tested these principles on trail, we found they work across budgets, and we recommend starting small: remove one pound safely, then earn the next pound through experience.
Frequently Asked Questions
How light should my pack be?
For a Lightweight Hiking Camping Setup, a safe target is usually 12–18 pounds of base weight for most hikers, while ultralight often means under pounds. We recommend starting by weighing every item, then trimming duplicates before cutting safety gear. Check permit and route conditions on NPS pages before lowering margins too far.
Can I go ultralight safely?
Yes, you can go ultralight safely if you keep the non-negotiables: shelter, insulation matched to forecast lows, navigation, water treatment, and emergency communication. Based on our analysis, the biggest mistakes happen when hikers cut rain protection or warm layers below safe temperature thresholds. Review backcountry safety guidance from the CDC and local land managers.
What’s the difference between lightweight and ultralight?
A Lightweight Hiking Camping Setup usually falls in the 12–18 lb base-weight range, while ultralight is typically under lb base weight. The difference isn’t just numbers; ultralight gear often costs more and has narrower comfort margins. If you’re new, we recommend building a lightweight kit first, then trimming from there.
Do I need a tent or will a tarp do?
A tarp can work if you know site selection, weather management, and bug pressure on your route. A tent is the easier choice for beginners, wet climates, and heavy insect seasons. REI Expert Advice has solid shelter selection basics, but your forecast and skill matter more than trend-driven gear choices.
How much food should I carry per day?
Most hikers need roughly 2,500–4,500 kcal per day depending on body size, terrain, and pack load. A practical planning range is 125–160 kcal per ounce of food, which keeps food bags compact without sacrificing energy. For route-specific planning, match intake to climbing days rather than averaging every day the same.
How do I handle rain with a lightweight setup?
Handle rain by protecting the items that fail catastrophically when wet: insulation, sleep system, and spare clothes. Use a pack liner, waterproof stuff sacks for critical items, and pitch shelter before unpacking. Leave No Trace weather and campsite guidance from Leave No Trace helps you stay dry without damaging fragile sites.
What emergency gear is essential?
Essential emergency gear includes a map and compass, a charged phone with offline maps, a headlamp, first-aid supplies, repair tape, fire starter where legal, and a PLB or satellite messenger for remote travel. We found that these items often weigh less than pounds combined but cover the biggest backcountry failure points.
How can I reduce pack weight fast?
The fastest way to reduce pack weight is to swap one heavy item from your ‘big three’: pack, shelter, or sleep system. Saving 8–16 ounces from one item is common, and replacing extra clothing can cut another 8–12 ounces. Start with your heaviest items and compare alternatives in a spreadsheet before buying.
Key Takeaways
- Set a realistic base-weight goal first: under lb for ultralight, or 12–18 lb for a safer lightweight comfort range.
- The fastest safe weight savings usually come from the big three, extra clothing, and better food and water planning.
- Don’t cut safety-critical items for weight; keep navigation, insulation, water treatment, first-aid, and emergency communication.
- Use a/60/90-day testing plan: weigh your kit, make one major swap, then validate it on short and multi-day shakedown trips.
- Buy gear based on durability, fit, and route conditions in 2026, not just the lowest listed weight on a product page.