
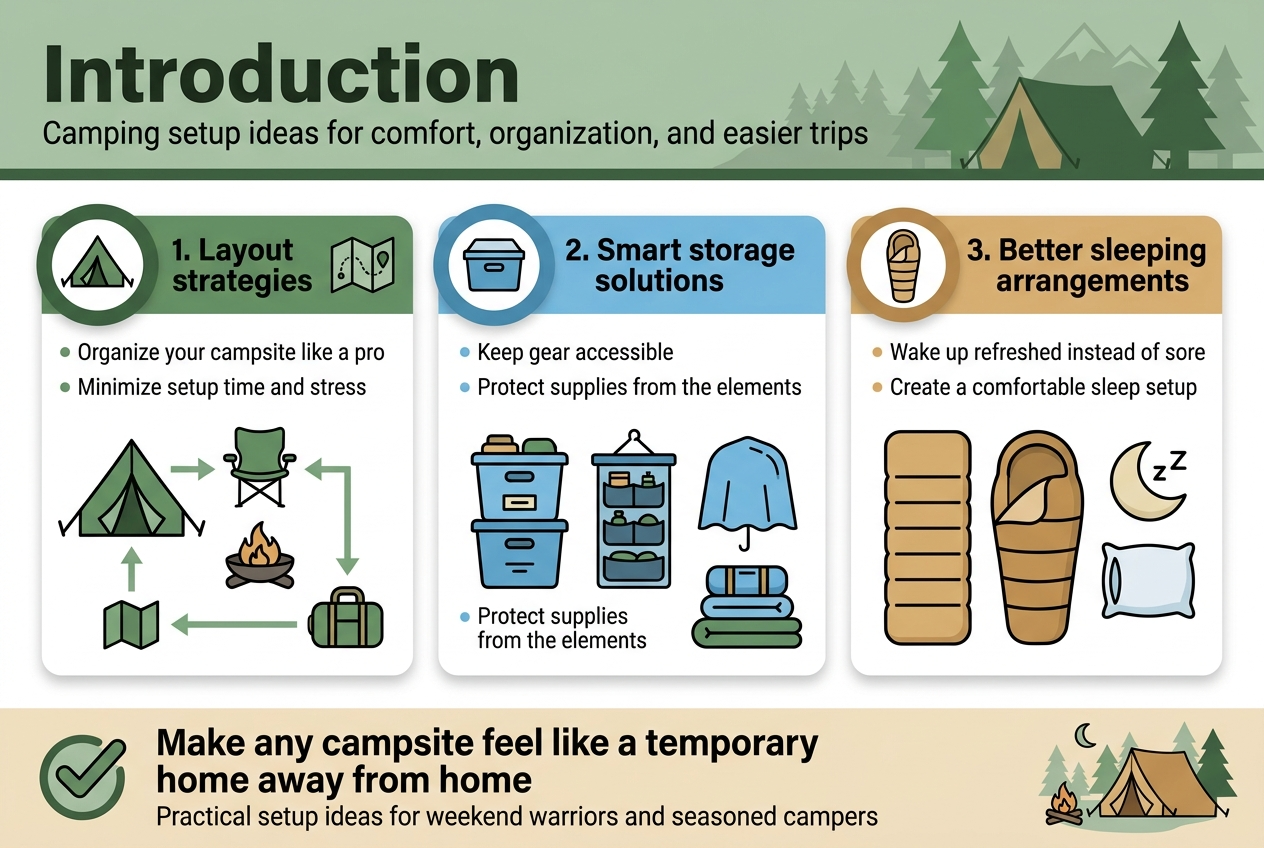
Getting your camping setup right can make the difference between a memorable outdoor adventure and a weekend of frustration. This guide is designed for both weekend warriors heading out for their first family trip and seasoned outdoor enthusiasts looking to streamline their camp organization.
A well-planned camping setup maximizes your comfort while minimizing setup time and stress. We’ll walk you through essential layout strategies that help you organize your campsite like a pro, plus smart storage solutions that keep your gear accessible and protected from the elements. You’ll also discover how to create sleeping arrangements that actually let you wake up refreshed instead of sore.
By the end, you’ll have practical camping setup ideas you can use on your next trip to transform any campsite into your temporary home away from home.
Essential Camping Layout Planning for Maximum Comfort
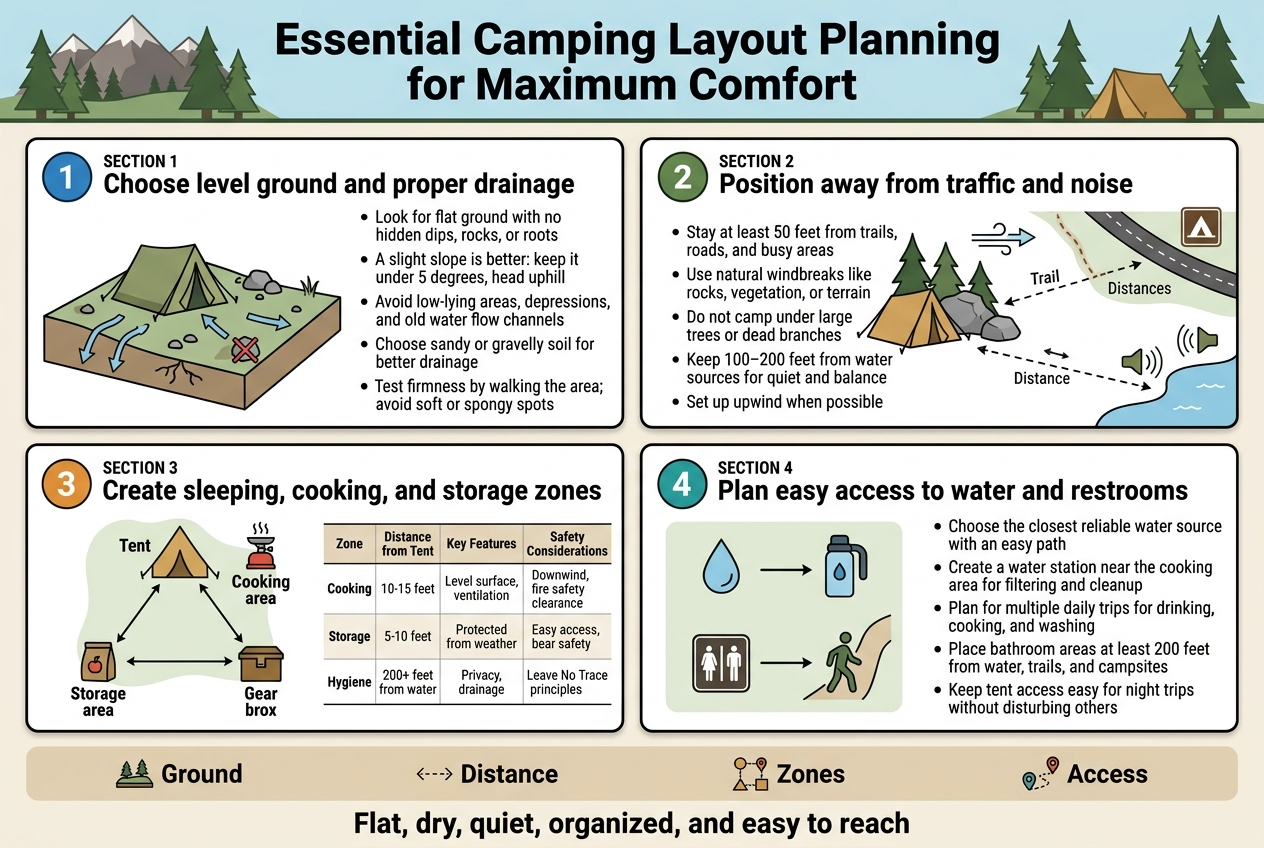
Choose level ground and proper drainage for your campsite
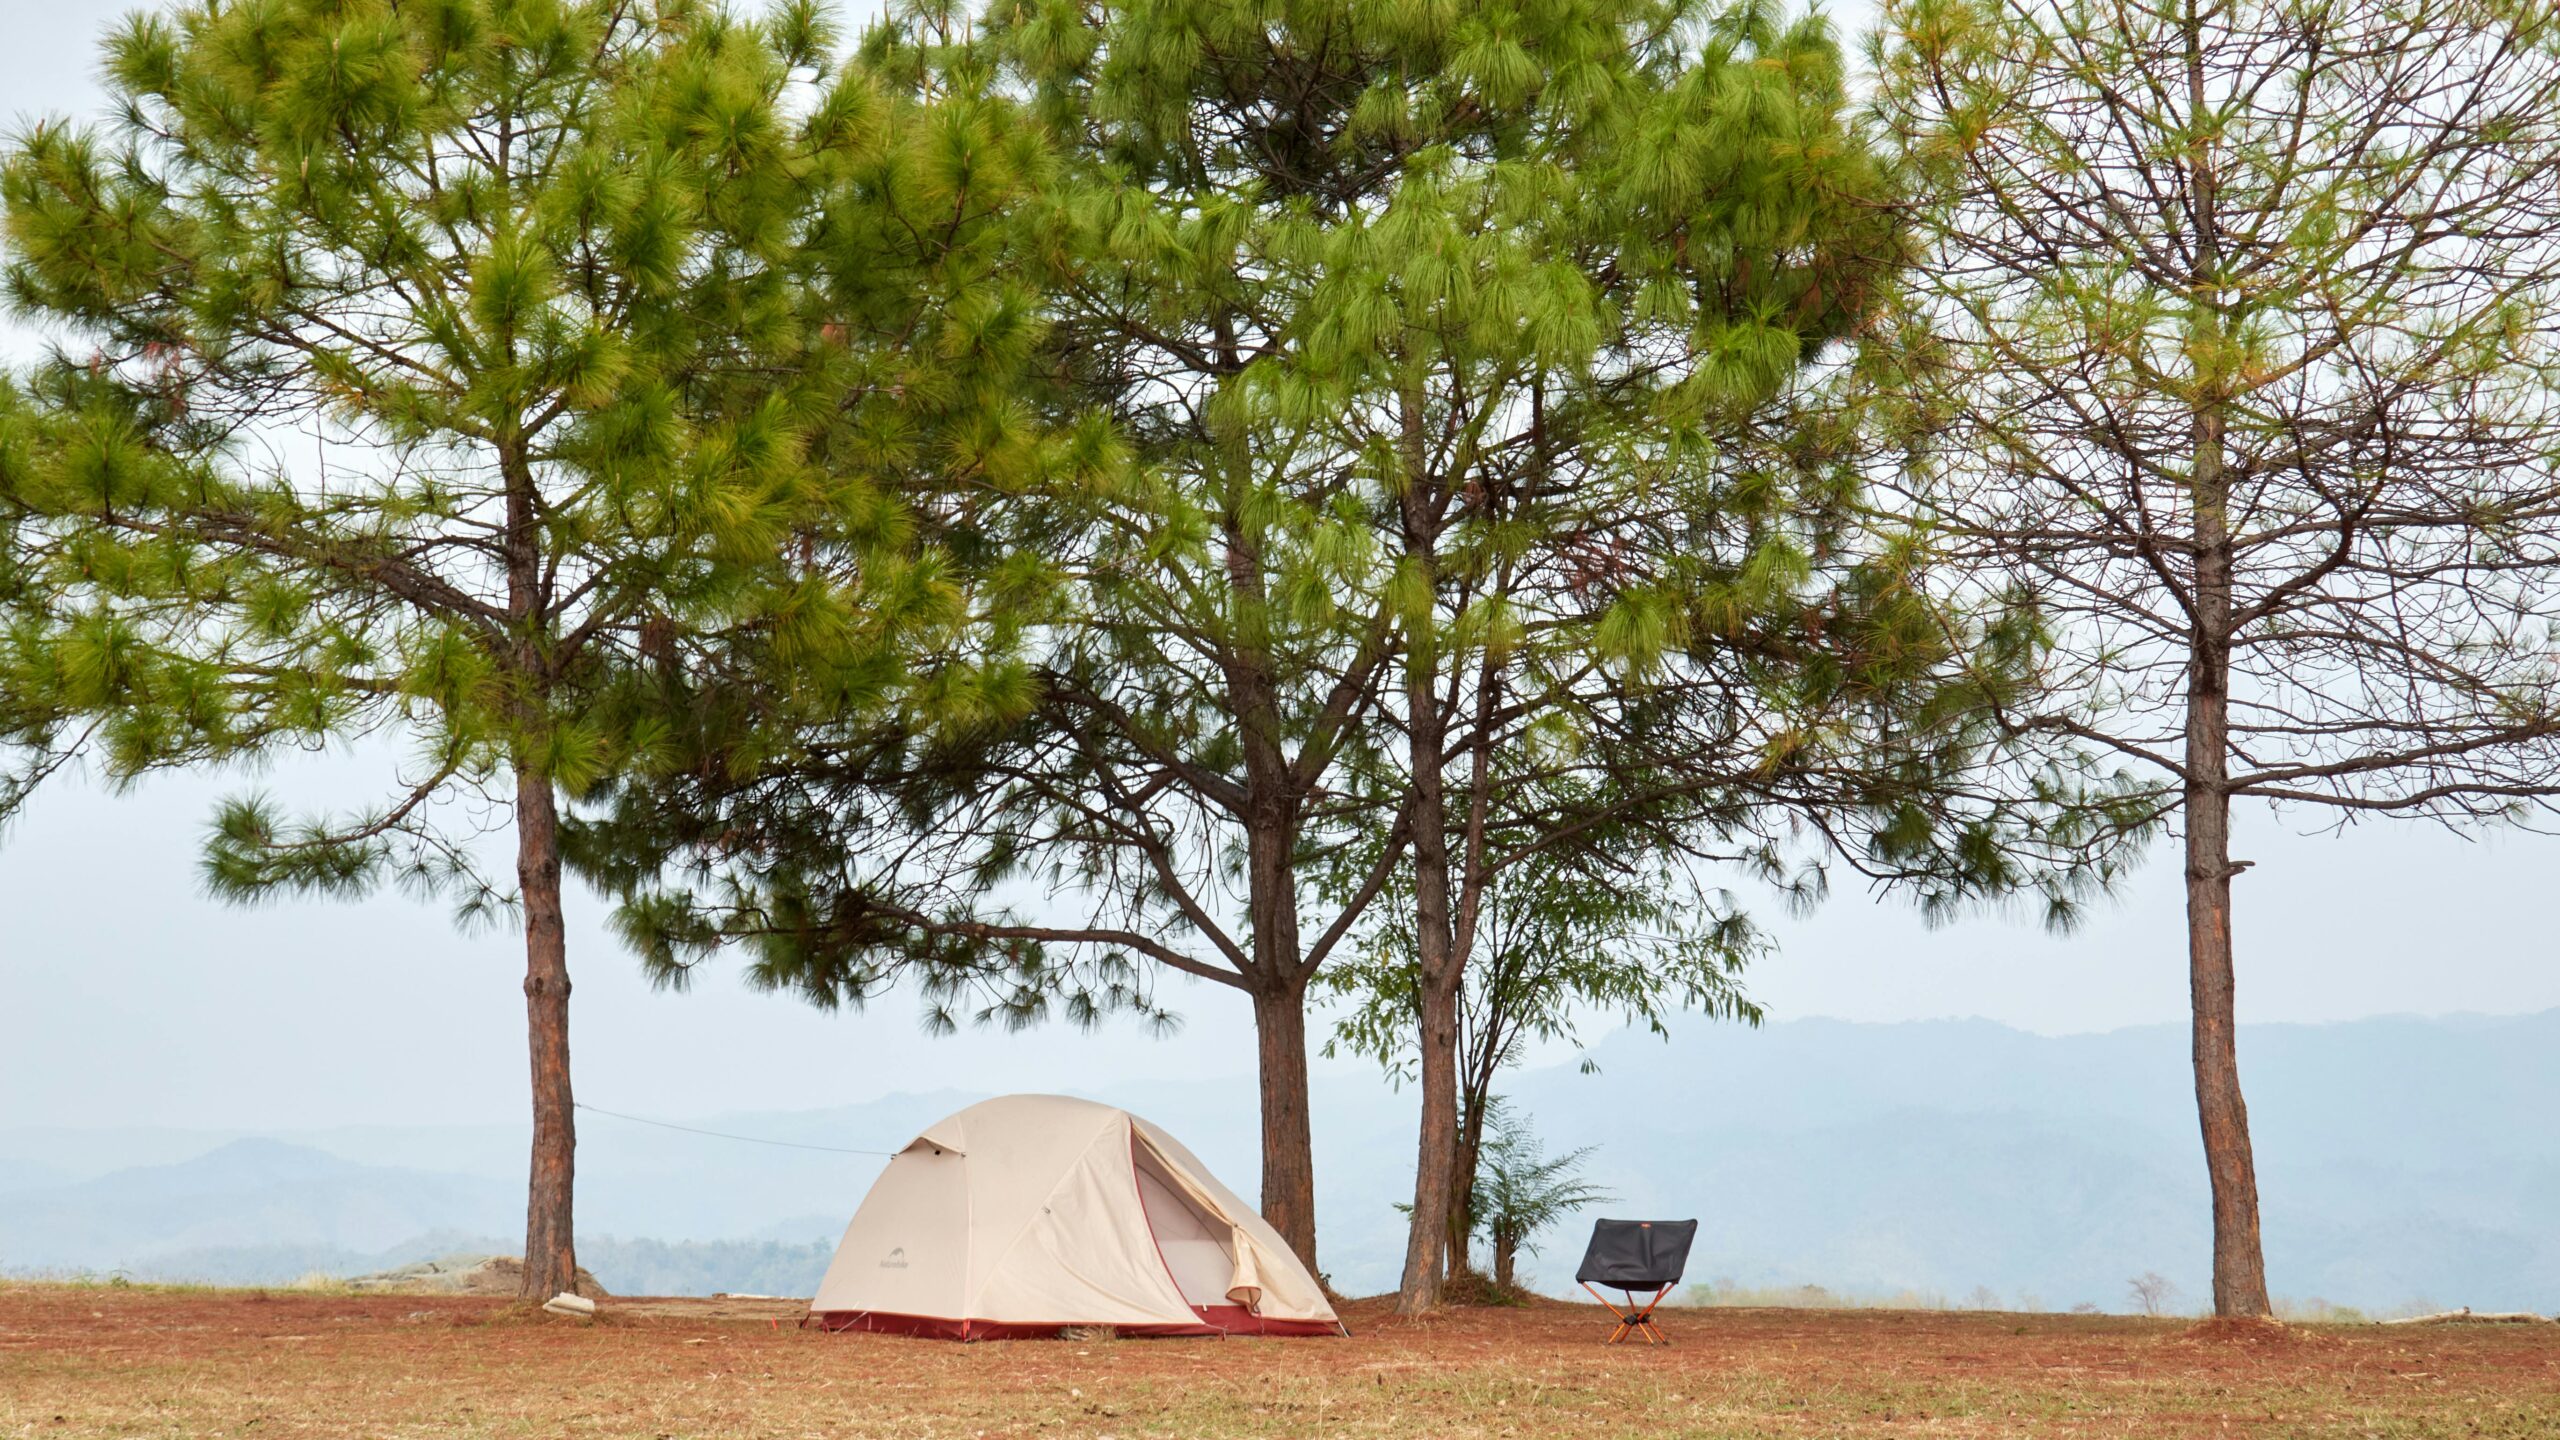
Finding the right spot for your tent starts with understanding what makes ground suitable for camping. Look for areas that appear flat to the naked eye, but don’t stop there. Get down on your hands and knees to feel for subtle dips, rocks, or roots that could turn into pressure points during the night. A slight slope is actually preferable to completely flat ground – aim for no more than a 5-degree incline with your head positioned uphill.
Drainage becomes critical during unexpected weather changes. Avoid low-lying areas, depressions, or spots that show signs of previous water flow like smooth rocks or packed earth. Check for natural water channels and imagine where rainwater would flow during a storm. Areas near streams or lakes might seem appealing but often become soggy and uncomfortable. Sandy or gravelly soil typically drains better than clay-heavy earth.
Test the ground firmness by walking around your potential campsite. Soft, spongy areas indicate poor drainage and potential moisture problems. Rocky terrain offers excellent drainage but requires careful padding. If you notice morning dew lingering longer in certain spots, that’s your cue to set up elsewhere.
Position your tent away from high traffic areas and noise sources
Strategic tent placement can make or break your camping experience. Position your tent at least 50 feet away from main trails, roads, or popular gathering spots. Campers walking to restrooms or water sources throughout the night create surprisingly high foot traffic that can disturb your sleep.
Consider natural windbreaks like large rocks, dense vegetation, or terrain features that can shield your tent from both wind and noise. However, avoid setting up directly under large trees or dead branches that could fall. The sweet spot is often behind or beside natural barriers rather than underneath them.
Water sources attract both wildlife and other campers, making them naturally noisy areas. While you want reasonable access to water, positioning your tent 100-200 feet away strikes the right balance between convenience and quiet. Pay attention to prevailing wind direction – cooking smells and campfire smoke from nearby sites can drift into your tent if you’re positioned downwind.
Create designated zones for sleeping, cooking, and storage
Efficient camp organization revolves around creating distinct activity zones that don’t interfere with each other. Your sleeping area should be the most protected and quiet space, while your cooking zone needs good ventilation and level surfaces. Storage areas require easy access but shouldn’t clutter your main living spaces.
Position your cooking zone downwind and at least 10-15 feet from your tent to prevent food odors from attracting wildlife to your sleeping area. This zone needs a flat, stable surface for camp stoves and prep work. Rocky outcroppings or fallen logs often provide natural countertops and seating.
Create a gear storage triangle connecting your tent, cooking area, and main activity space. This arrangement minimizes walking distance while keeping frequently used items accessible. Use natural features like large rocks or trees as anchor points for hanging gear or creating windscreens.
| Zone | Distance from Tent | Key Features | Safety Considerations |
|---|---|---|---|
| Cooking | 10-15 feet | Level surface, ventilation | Downwind, fire safety clearance |
| Storage | 5-10 feet | Protected from weather | Easy access, bear safety |
| Hygiene | 200+ feet from water | Privacy, drainage | Leave No Trace principles |
Plan for easy access to water sources and restroom facilities
Water access planning involves balancing convenience with environmental responsibility and safety. Identify the closest reliable water source before setting up camp, but remember that proximity doesn’t always equal convenience. A water source 200 yards away with a clear, easy path often beats one that’s closer but requires scrambling over rocks or through dense brush.
Consider the water collection process itself. You’ll need space to filter, treat, or boil water near your cooking area. Factor in multiple daily trips for drinking water, cooking, and cleaning. A dedicated water station within your camp setup – perhaps a flat rock or camp table near your cooking zone – streamlines meal preparation and cleanup.
Restroom facilities require similar strategic thinking. Government campgrounds typically have facilities, but backcountry camping demands following Leave No Trace principles. Plan your bathroom area at least 200 feet from water sources, trails, and campsites. Choose a spot that offers privacy and appropriate soil conditions for waste disposal.
Morning and evening routines create the heaviest traffic to both water sources and restrooms. Position your tent to allow easy exit and re-entry without disturbing sleeping partners, especially during those inevitable middle-of-the-night trips.
Smart Tent Setup Strategies That Save Time and Energy

Master the art of quick tent assembly with practice runs
Setting up your tent in the dark after a long day of driving to your campsite isn’t fun. The key to avoiding this stress lies in practicing at home before you leave. Spread your tent out in your backyard or living room and time yourself assembling it multiple times. This hands-on practice helps you memorize where each pole goes and which clips attach where.
Start by laying out all components systematically. Group poles by color or size, separate stakes, and identify guy lines. Most modern tents use color-coded systems – match red clips to red poles, for example. Practice in different lighting conditions, including using only a headlamp, since you might need to set up camp after sunset.
Keep your tent manual handy during practice sessions and take photos of tricky connections. Store these photos on your phone for quick reference in the field. Many campers can cut their setup time from 30 minutes to under 10 minutes with just a few practice runs.
Use footprints and tarps to protect your tent floor
Your tent floor takes a beating from rocks, sticks, and moisture underneath. A dedicated footprint – a custom-fitted groundsheet made specifically for your tent model – provides the best protection. These perfectly sized tarps prevent punctures and extend your tent’s lifespan significantly.
If you don’t have a footprint, use a lightweight tarp cut slightly smaller than your tent’s floor dimensions. Never let the tarp extend beyond your tent’s edges, as this creates a water collection system that directs rain under your shelter. The tarp should be about two inches smaller on all sides.
Polycro (window insulation film) offers an ultralight alternative for backpackers. This material weighs almost nothing but provides excellent puncture protection. For car camping, heavy-duty tarps work great and cost much less than custom footprints.
Secure guy lines and stakes for weather protection
Properly tensioned guy lines transform a flimsy shelter into a stable, weather-resistant home. Most campers skip this step in good weather, but sudden storms can turn your relaxing trip into a disaster if your tent collapses.
Use the right stakes for your terrain. Standard aluminum stakes work fine in soft soil, but rocky ground requires heavy-duty steel stakes. Beach camping needs extra-long sand stakes or sand anchors. Always bring a few extra stakes – you’ll inevitably bend or lose some.
Attach guy lines before the weather turns bad. Tension them firmly but not overly tight, as temperature changes cause fabric to expand and contract. Reflective guy line helps prevent tripping at night, and adding small LED lights or glow sticks makes them even more visible.
Create proper anchoring points if your campsite lacks trees or large rocks. Bury stuff sacks filled with sand or rocks as deadman anchors. This technique works especially well in sandy or loose soil where regular stakes pull out easily.
Create proper ventilation to prevent condensation buildup
Nothing ruins a good night’s sleep like waking up in a soggy tent. Condensation forms when warm, moist air from your breathing hits cold tent walls. Even the best waterproof tents need airflow to stay dry inside.
Open vents even when it’s cold outside. Most modern tents feature mesh panels covered by waterproof flaps. Keep these mesh areas uncovered whenever possible. Position your tent to take advantage of natural breezes, with the door facing prevailing winds when weather permits.
Avoid common mistakes that increase condensation. Don’t bring wet gear inside your tent, and never cook inside unless you have a tent specifically designed for it. Keep your tent’s interior as dry as possible by storing damp items in the vestibule or under a separate tarp.
Consider the thermal chimney effect when setting up. Hot air rises and exits through roof vents while cooler air enters through lower openings. This natural circulation keeps air moving and reduces moisture buildup. Some campers add small battery-powered fans to boost airflow on still nights.
Organized Camp Kitchen Solutions for Effortless Meal Prep
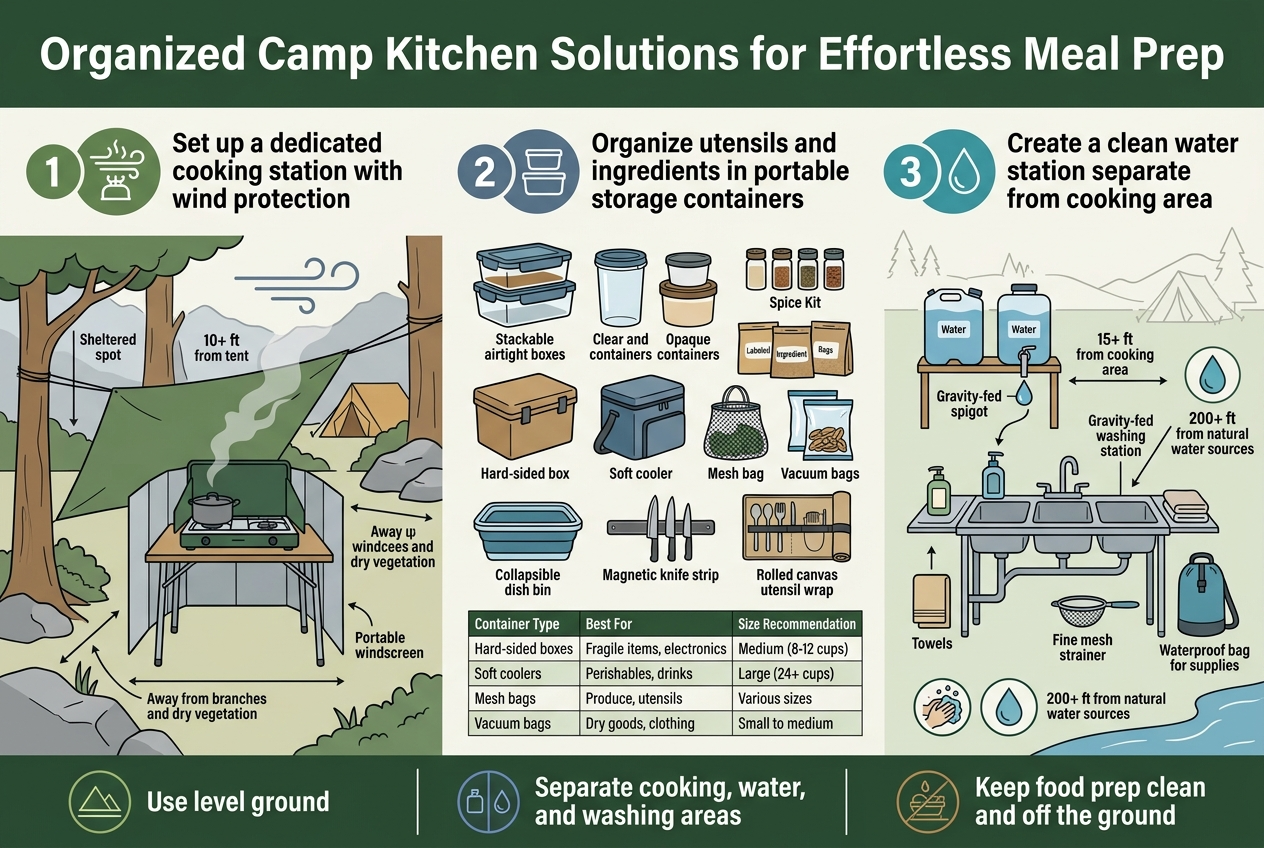
Set up a dedicated cooking station with wind protection
Finding the perfect spot for your camp kitchen makes all the difference between a smooth cooking experience and a frustrating battle with the elements. Look for naturally sheltered areas like rock formations, dense trees, or the lee side of hills. If natural windbreaks aren’t available, create your own using a tarp stretched between trees or camping poles.
Position your cooking station on level ground at least 10 feet from your tent to prevent cooking odors from attracting wildlife to your sleeping area. Keep your stove and prep surfaces away from overhanging branches or dry vegetation that could catch fire. A portable windscreen around your camp stove will protect flames from gusts and improve fuel efficiency by up to 30%.
Consider the wind direction throughout the day when setting up. Morning breezes often shift as temperatures rise, so position your cooking area where smoke will blow away from your campsite regardless of wind changes. Pack a lightweight camping table or use a flat rock as your primary prep surface – this keeps food off the ground and creates a more hygienic cooking environment.
Organize utensils and ingredients in portable storage containers
Smart organization transforms chaotic meal prep into an efficient process. Invest in stackable, airtight containers that nest inside each other when empty to save pack space. Clear containers let you quickly identify contents without opening every lid, while opaque ones protect light-sensitive items like spices and oils.
Create a dedicated spice kit using small jars or pill organizers filled with your most-used seasonings. Pre-measure ingredients for specific meals and store them in labeled bags – this eliminates the need to bring entire containers and reduces weight significantly.
| Container Type | Best For | Size Recommendation |
|---|---|---|
| Hard-sided boxes | Fragile items, electronics | Medium (8-12 cups) |
| Soft coolers | Perishables, drinks | Large (24+ cups) |
| Mesh bags | Produce, utensils | Various sizes |
| Vacuum bags | Dry goods, clothing | Small to medium |
Pack a collapsible bin for washing dishes and another for organizing cooking utensils. Magnetic knife strips work great inside metal camp boxes, keeping blades secure and easily accessible. Roll silverware and small tools in a canvas wrap to prevent rattling and damage during transport.
Create a clean water station separate from cooking area
Water management at camp requires thoughtful planning to maintain hygiene and prevent contamination. Set up your clean water station at least 15 feet from your cooking area and 200 feet from any natural water sources to protect local ecosystems from soap and food particles.
Bring multiple water containers: one for drinking water only, another for cooking and cleaning. Mark them clearly with different colored tape or labels to avoid confusion. A gravity-fed water system using a large container with a spigot eliminates the need to lift heavy jugs repeatedly and provides hands-free operation.
Pack biodegradable soap in small quantities and use a three-basin system for washing: one for washing with soapy water, one for rinsing, and one for sanitizing with a diluted bleach solution or boiling water. Strain all wash water through a fine mesh to catch food particles before dispersing it properly away from your campsite.
Keep a dedicated hand-washing station with soap and clean towels near your food prep area. This simple step prevents the spread of bacteria and makes outdoor cooking much safer. Store cleaning supplies in a waterproof bag to prevent spills from contaminating other gear.
Weather-Proof Storage Systems That Keep Gear Dry and Accessible
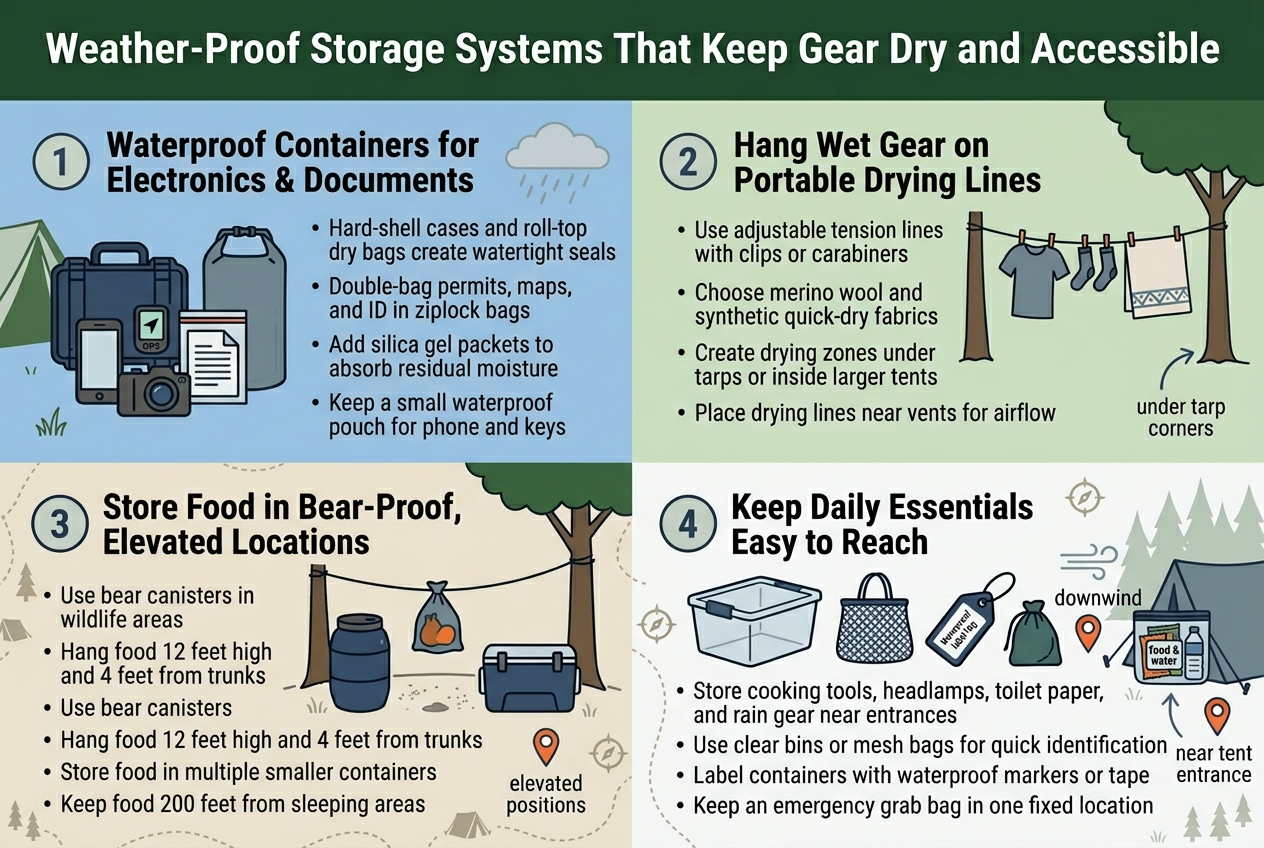
Utilize waterproof containers for electronics and important documents
Electronics and paper documents represent your most vulnerable camping gear when moisture strikes. Invest in hard-shell pelican cases or high-quality dry bags with roll-top closures for absolute protection. These containers create watertight seals that keep phones, cameras, GPS devices, and backup batteries completely dry even during torrential downpours.
For documents like permits, maps, and identification, double-bag them in ziplock bags before placing them inside waterproof containers. Consider laminating frequently referenced items like trail maps or emergency contact information. Silica gel packets thrown into these containers absorb any residual moisture that might sneak in during opening and closing.
Smart campers keep a small waterproof pouch attached to their person for immediate access items like phones and keys. This prevents the frustrating scenario of needing to dig through larger storage containers during unexpected weather events.
Hang wet clothes and gear on portable drying lines
Moisture management extends beyond just keeping things dry – you need efficient systems for drying wet items quickly. Portable clotheslines with adjustable tensioning systems work perfectly between trees or tent guy-lines. Look for lines with built-in clips or carabiners that won’t blow away in wind.
Pack lightweight, quick-dry fabrics that shed moisture rapidly. Merino wool and synthetic materials dry much faster than cotton and maintain insulating properties even when damp. Create dedicated drying zones away from high-traffic areas where people might bump into hanging gear.
During rainy periods, string lines inside larger tents or under tarps. Position these drying areas near tent vents to promote airflow without creating condensation problems inside your sleeping space.
Store food in bear-proof containers and elevated locations
Food storage combines safety protocols with practical access needs. Bear canisters provide foolproof protection in areas with aggressive wildlife populations, though they’re bulky and limit food quantities. Hang food bags at least 12 feet high and 4 feet from tree trunks when bear canisters aren’t required.
Cache food in multiple smaller containers rather than one large bag. This approach spreads risk and makes portions easier to access without exposing your entire food supply. Hard-sided coolers work well for car camping situations, while lightweight bear rope systems suit backcountry adventures.
Position food storage areas downwind and at least 200 feet from sleeping areas. This distance protects you if wildlife does investigate your food cache during nighttime hours.
Keep frequently used items in easily accessible spots
Design your storage system around usage frequency rather than item categories. Cooking utensils, headlamps, toilet paper, and weather gear need immediate access locations near tent entrances or under easily removable tarp corners.
Use clear storage bins or mesh bags that let you identify contents at a glance. Label containers with waterproof markers or tape to speed up nighttime searches when visibility drops. Create staging areas near your tent door where you can quickly grab essential items without disturbing sleeping tentmates.
Pack a “grab bag” with emergency essentials like first aid supplies, flashlights, and emergency whistles. Keep this container in the same location throughout your trip so everyone knows exactly where to find critical items during stressful situations.
Comfortable Sleeping Arrangements for Restful Nights Outdoors
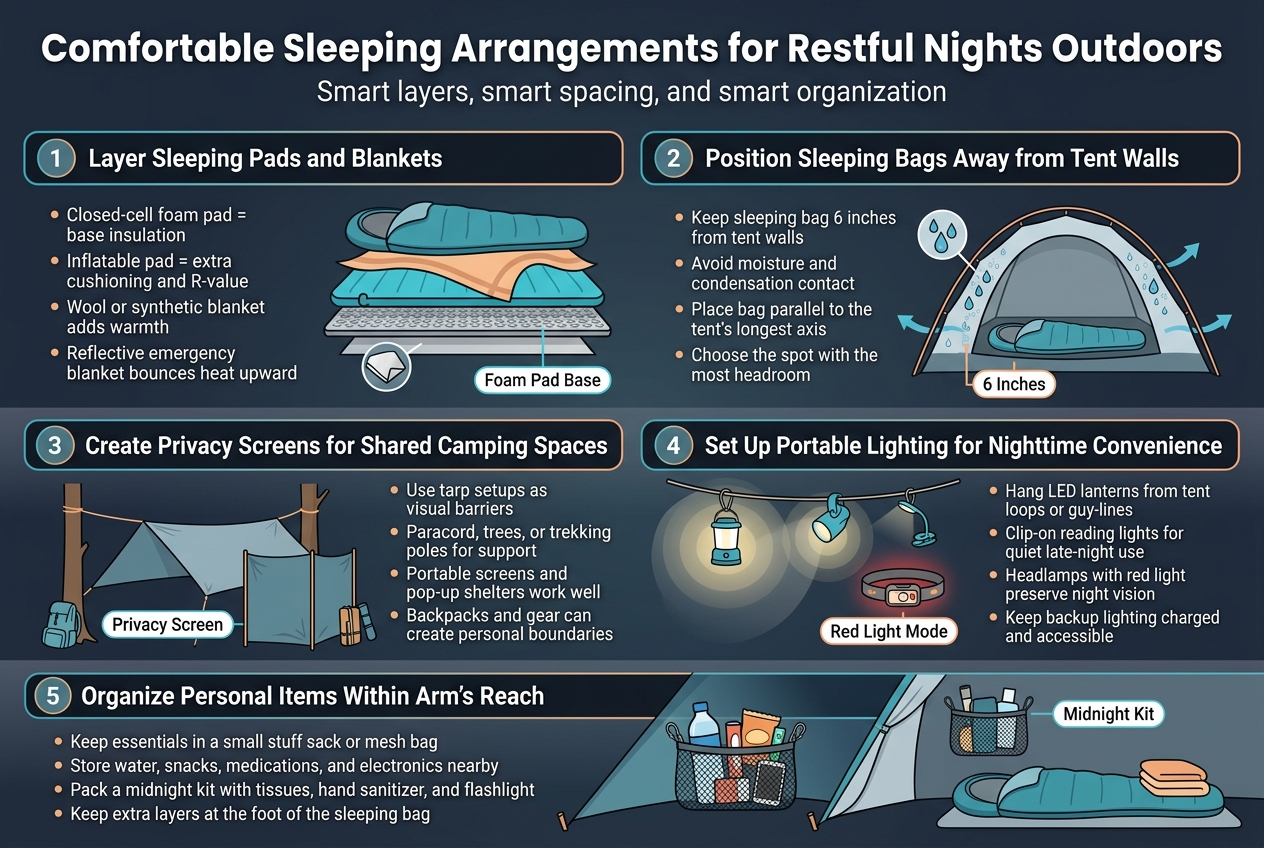
Layer Sleeping Pads and Blankets for Optimal Insulation
Your sleeping setup acts as your personal fortress against the cold ground and temperature fluctuations. Start with a closed-cell foam pad as your base layer – it’s puncture-resistant and provides excellent insulation from ground cold. Stack an inflatable sleeping pad on top for cushioning and additional R-value. This double-pad system works like a charm, especially in shoulder seasons when temperatures drop unexpectedly.
Add a blanket between your sleeping bag and pads for extra warmth. Wool or synthetic blankets work best since they retain insulating properties even when damp. For winter camping, consider placing a reflective emergency blanket under your foam pad to bounce body heat back upward.
Position Sleeping Bags Away from Tent Walls
Tent walls collect condensation overnight, creating cold, damp spots that can soak through your gear. Keep your sleeping bag at least 6 inches from any tent wall to avoid contact with moisture. This spacing also prevents your body heat from creating additional condensation on the fabric.
Choose the spot with the most headroom for comfortable entry and exit. Position your bag parallel to the tent’s longest axis to maximize space and airflow. If sharing a tent, coordinate sleeping positions to avoid the dreaded midnight elbow jabs.
Create Privacy Screens for Shared Camping Spaces
Group camping doesn’t mean sacrificing personal space. Lightweight tarp setups work perfectly as visual barriers between sleeping areas. String paracord between trees or trekking poles and drape a tarp or emergency blanket to create instant privacy walls.
Portable camping screens or pop-up shelters offer more structured solutions. These fold flat for transport and set up quickly around your sleeping zone. Even a simple arrangement of backpacks and gear can establish personal boundaries in shared spaces.
Set Up Portable Lighting for Nighttime Convenience
Nothing beats having light exactly where you need it during nighttime tent activities. Hang LED lanterns from tent loops or attach them to guy-lines for ambient lighting that doesn’t blind your tent-mates. Clip-on reading lights work great for late-night book sessions without disturbing others.
Headlamps with red light modes preserve night vision while providing hands-free illumination. Keep backup lighting sources charged and accessible – phone flashlights drain batteries quickly in cold weather.
Organize Personal Items Within Arm’s Reach of Your Sleeping Area
Create a personal staging area next to your sleeping spot for essentials. Use a small stuff sack or mesh bag to hold items like water bottles, snacks, medications, and electronics. Clip or hang this organizer from tent loops or place it in your tent’s vestibule.
Keep a dedicated “midnight kit” with tissues, hand sanitizer, and a small flashlight in your sleeping bag pocket. Store extra layers at the foot of your sleeping bag – your body heat keeps them warm and ready for chilly morning departures.
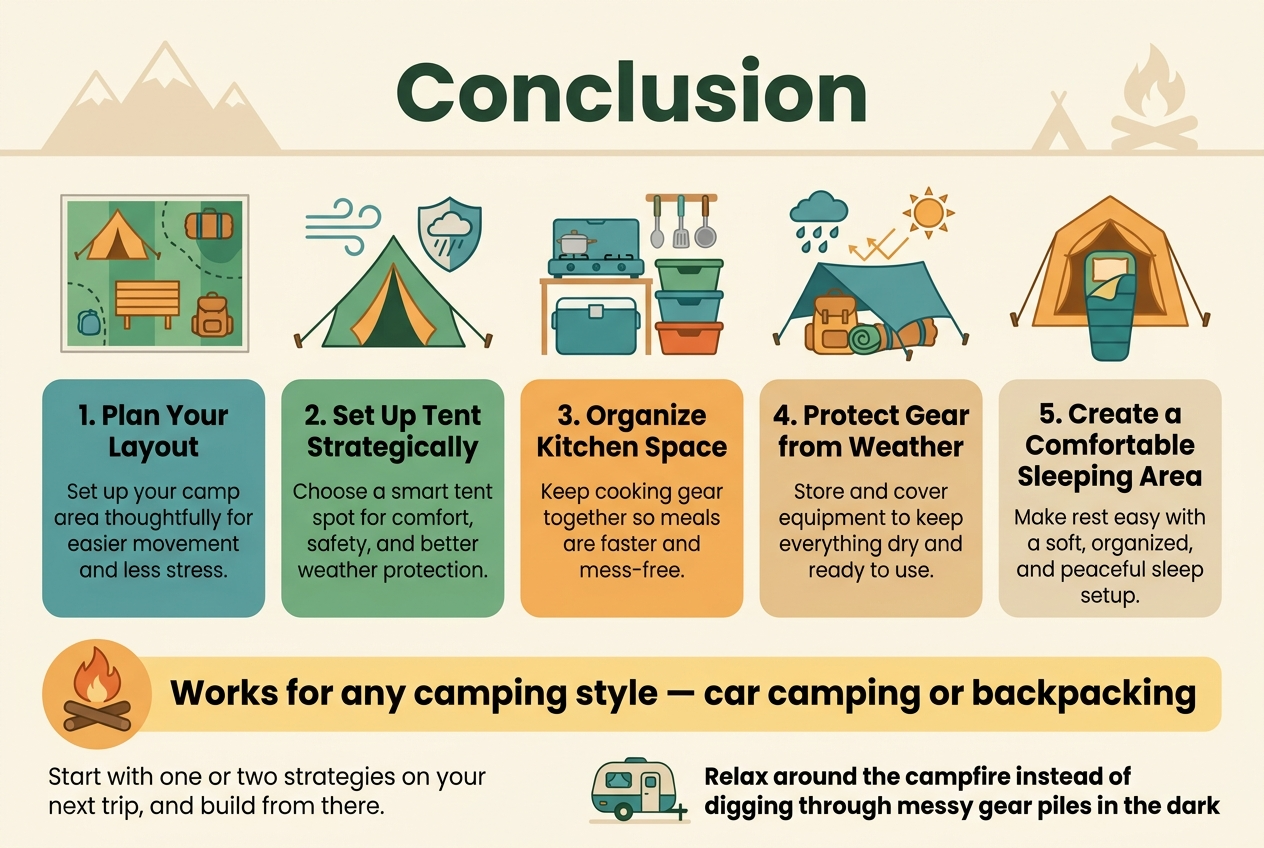
Smart camping setup makes all the difference between a stressful trip and an amazing outdoor adventure. When you plan your layout thoughtfully, set up your tent strategically, organize your kitchen space, protect your gear from weather, and create a comfortable sleeping area, you’re setting yourself up for success from day one.
The best part about these setup ideas is that they work for any camping style, whether you’re car camping with the family or backpacking solo. Start with one or two of these strategies on your next trip and build from there. Your future camping self will thank you when you’re relaxing around the campfire instead of digging through messy gear piles in the dark.